You are using an out of date browser. It may not display this or other websites correctly.
You should upgrade or use an alternative browser.
You should upgrade or use an alternative browser.

Help Support Ducati Forum:
- Joined
- Jun 3, 2015
- Messages
- 1,037
- Location
- Nashville TN
just to reiterate - on the 1299, removing that electronic valve in the hose next to the charcoal canister is harmless. I've put on a couple thousand miles since unplugging it, and no errors, nothing.
Other than the plug in the harness, it's like there never was a charcoal vent system at all on my bike
Other than the plug in the harness, it's like there never was a charcoal vent system at all on my bike
- Joined
- Oct 5, 2015
- Messages
- 251
- Location
- Orange County, CA
+1Hmmm. I had to put a 12.5 Ohm resistor in that valve plug. It threw an engine code and an EOBD code when i unplugged the valve. 1299S
I got a check engine light when disconnecting the electronic valve so the ECU does check for its presence.
As endodoc noted, I did what he did by inserting a resistor into the plug to eliminate the check engine light.
EDIT: 2015 1299base
- Joined
- Oct 5, 2015
- Messages
- 251
- Location
- Orange County, CA
Thanks for pics! I did the same deleting the vacuum hoses (sans Ti bolts, SS instead) but certainly feels therapeutic, lol.ok, finally got to doing this on my 1299. I used titanium M6x1.00 8mm bolts, because, well, why not?
Here's a pic of the finished job to replace the one that's aged-out on the OP. I tend to over-do it on zipties, but there's no tubing touching metal anywhere, and only the original drains are in use. The Y connector is up near the lower radiator hose clamp. The vacuum line is plugged with a M4 bolt I torqued in with a socket wrench. Ain't goin' nowhere. No hose pinching going on either.

Consistently fires up like a champ now! Especially when over 180F which was a growing problem with the charcoal canister on. Quite a bit of gas in the charcoal canister I might add, despite being super-careful to never overfill.
What drain line is this that the "Y" is inserted into?
When I pinch off my vent hose, the one that ends up being plugged, my bike sputters out and dies...how come everyone else's work fine? I started this mod tonight and I can't T the overflow because the internal diameter is much smaller than the other one...is my canister set up backwards?
- Joined
- Nov 4, 2014
- Messages
- 311
- Location
- San Diego, CA
What drain line is this that the "Y" is inserted into?
From the gas tank
Attachments
- Joined
- Mar 26, 2018
- Messages
- 242
- Location
- North Carolina
The charcoal canister is an emissions piece and can be the source of hard starting (do a search for more info--lots written about it).
Most dealers won't remove it, so if you want to do it you'll have to do it yourself. Not many mods are easier than this, so long as you know which line to cap and which to vent.
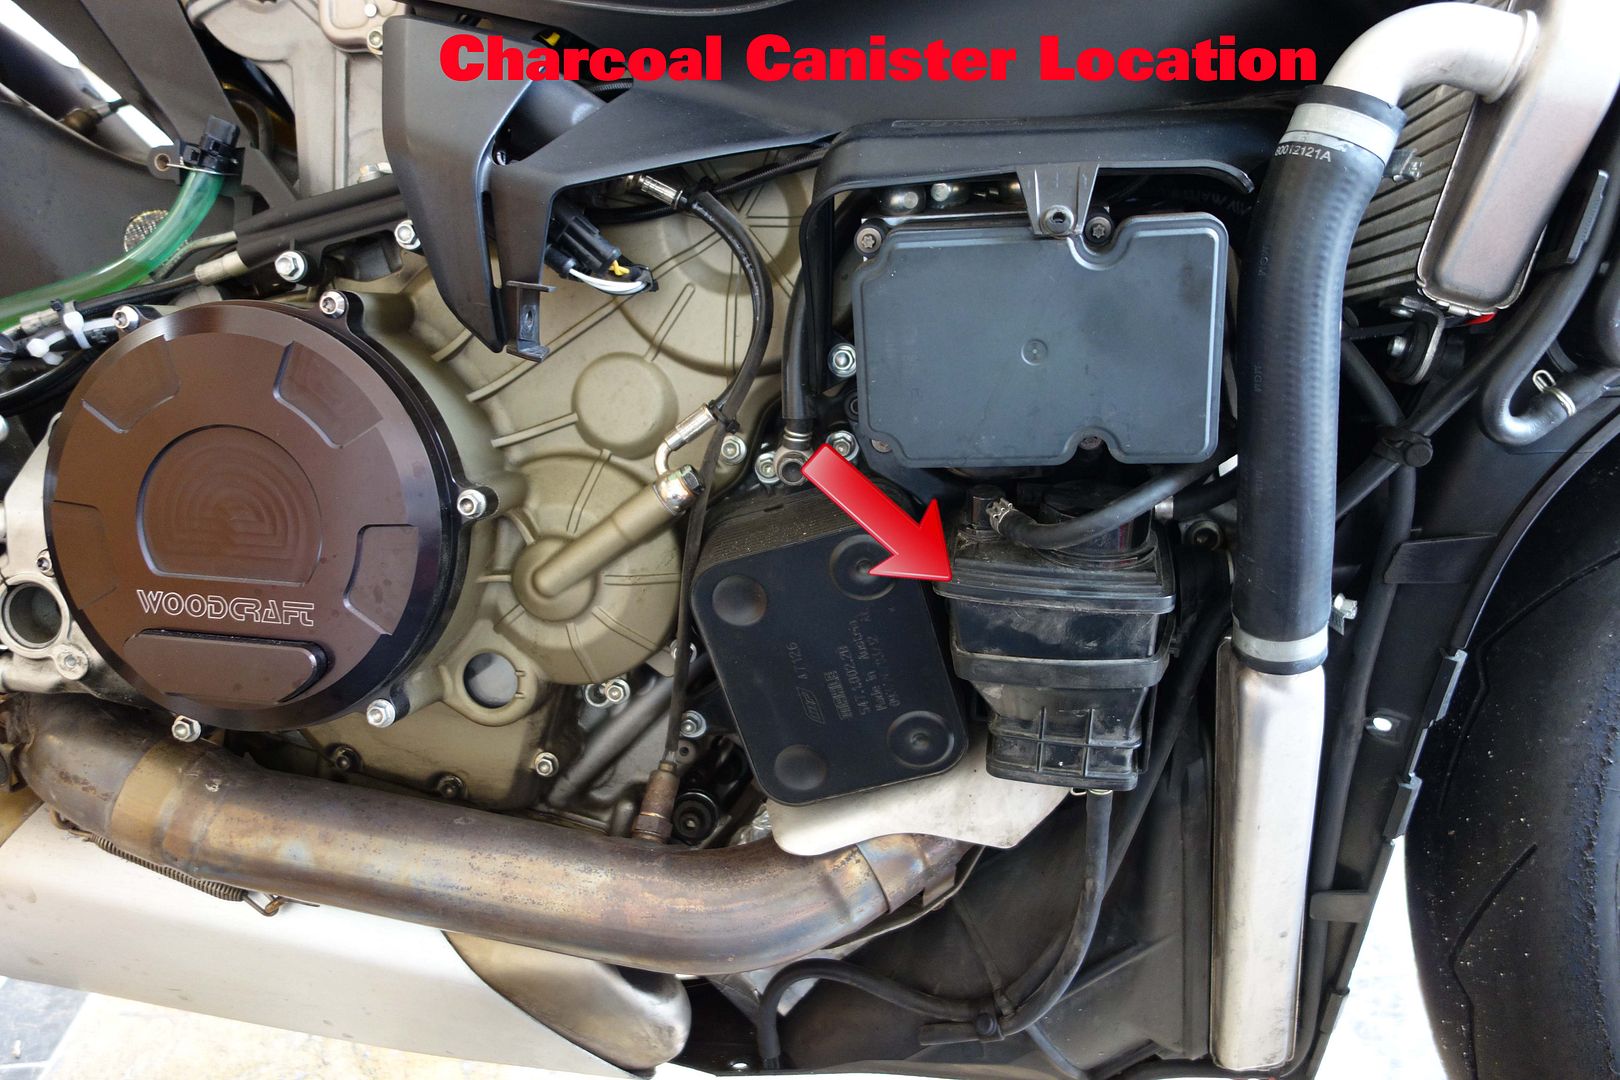
1) Remove your upper and lower right side fairings, which will expose the canister.

2) Undo the rubber strap holding the canister to the bike, then remove the top two hoses (cutting off with scissors works if you don't plan on ever installing it again).

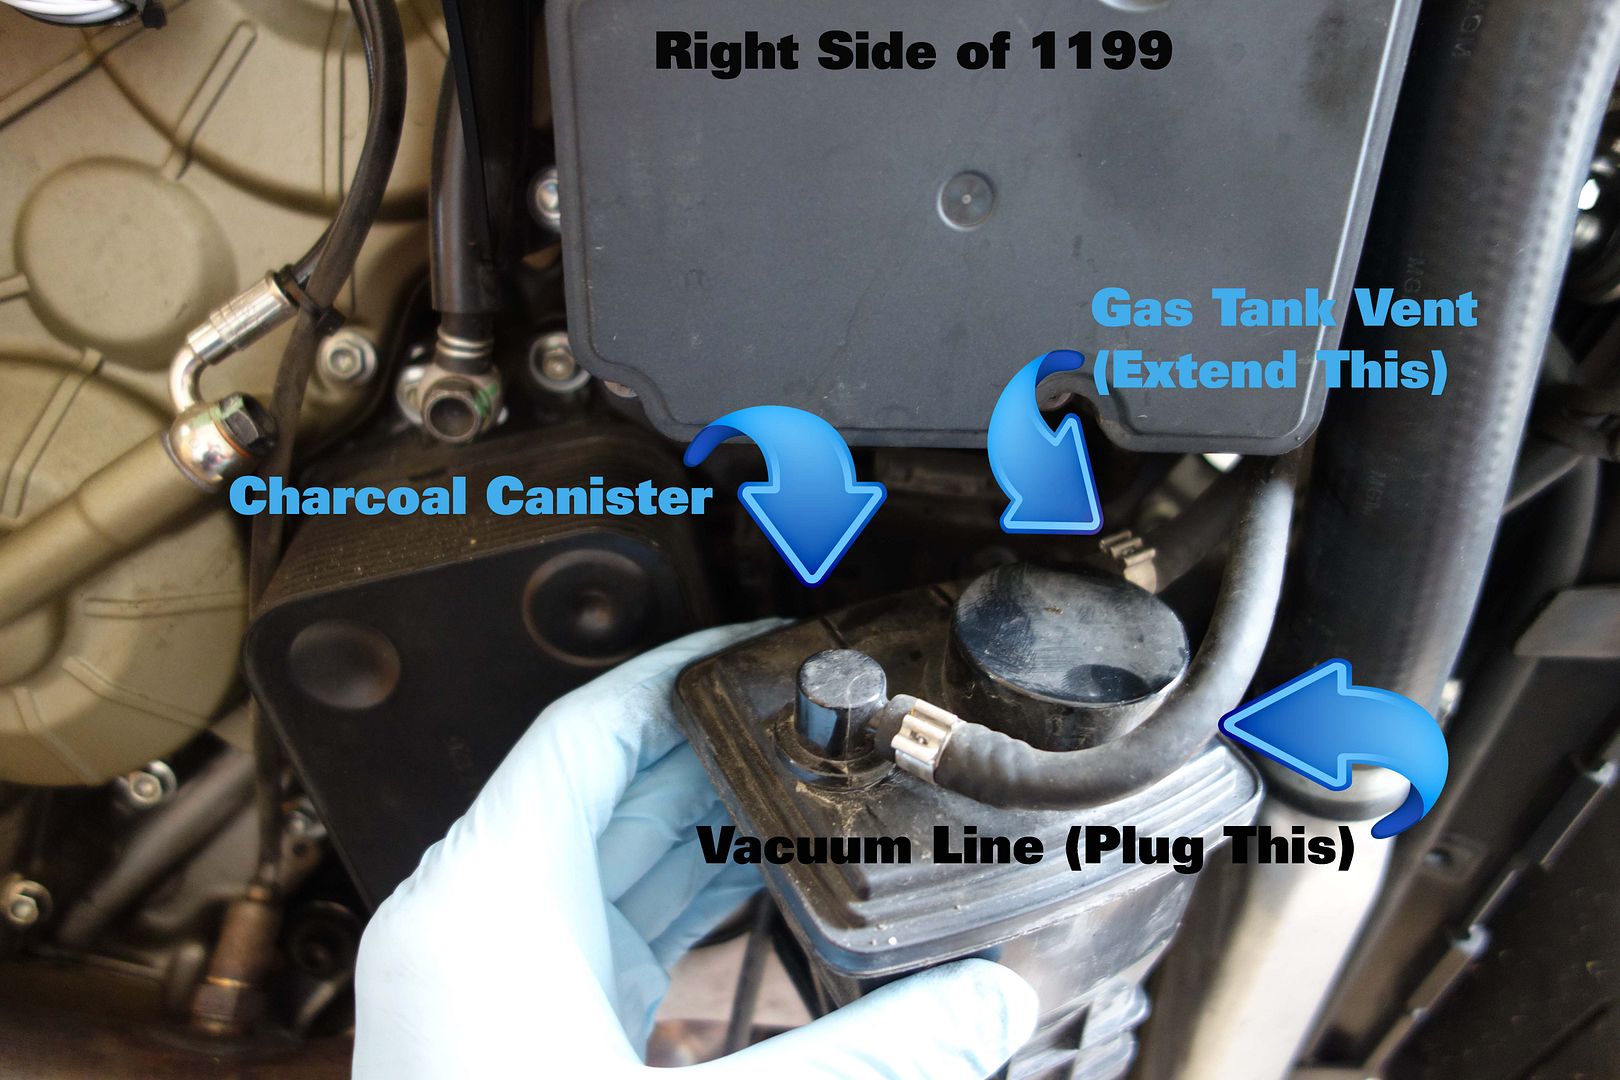
As in the picture, one of the lines leads from the gas tank to the canister and the other leads from the canister back up into the intake:

3) The line from the tank (which has a larger inside diameter than the vacuum line in case you cut both lines and now can't figure out which was which) needs to be extended using about another 12" of hose and a hose barb and routed to a safe place (read: far away from your headers/exhaust!). I removed the hose from the bottom of the canister and used this to extend the fuel vent line, which was conveniently just the right length. Route it wherever it's safe to route it, as gas/gas vapors will be escaping from this line. Make sure it's not blocked, kinked, smashed, or plugged with the bodywork back on.
4) Plug the vacuum line (which has a smaller inside diameter than the vent line). You can cap it with a hose cap, fold it and zip tie it tightly, or shove an M4 screw into it and zip tie it (which is what I did).
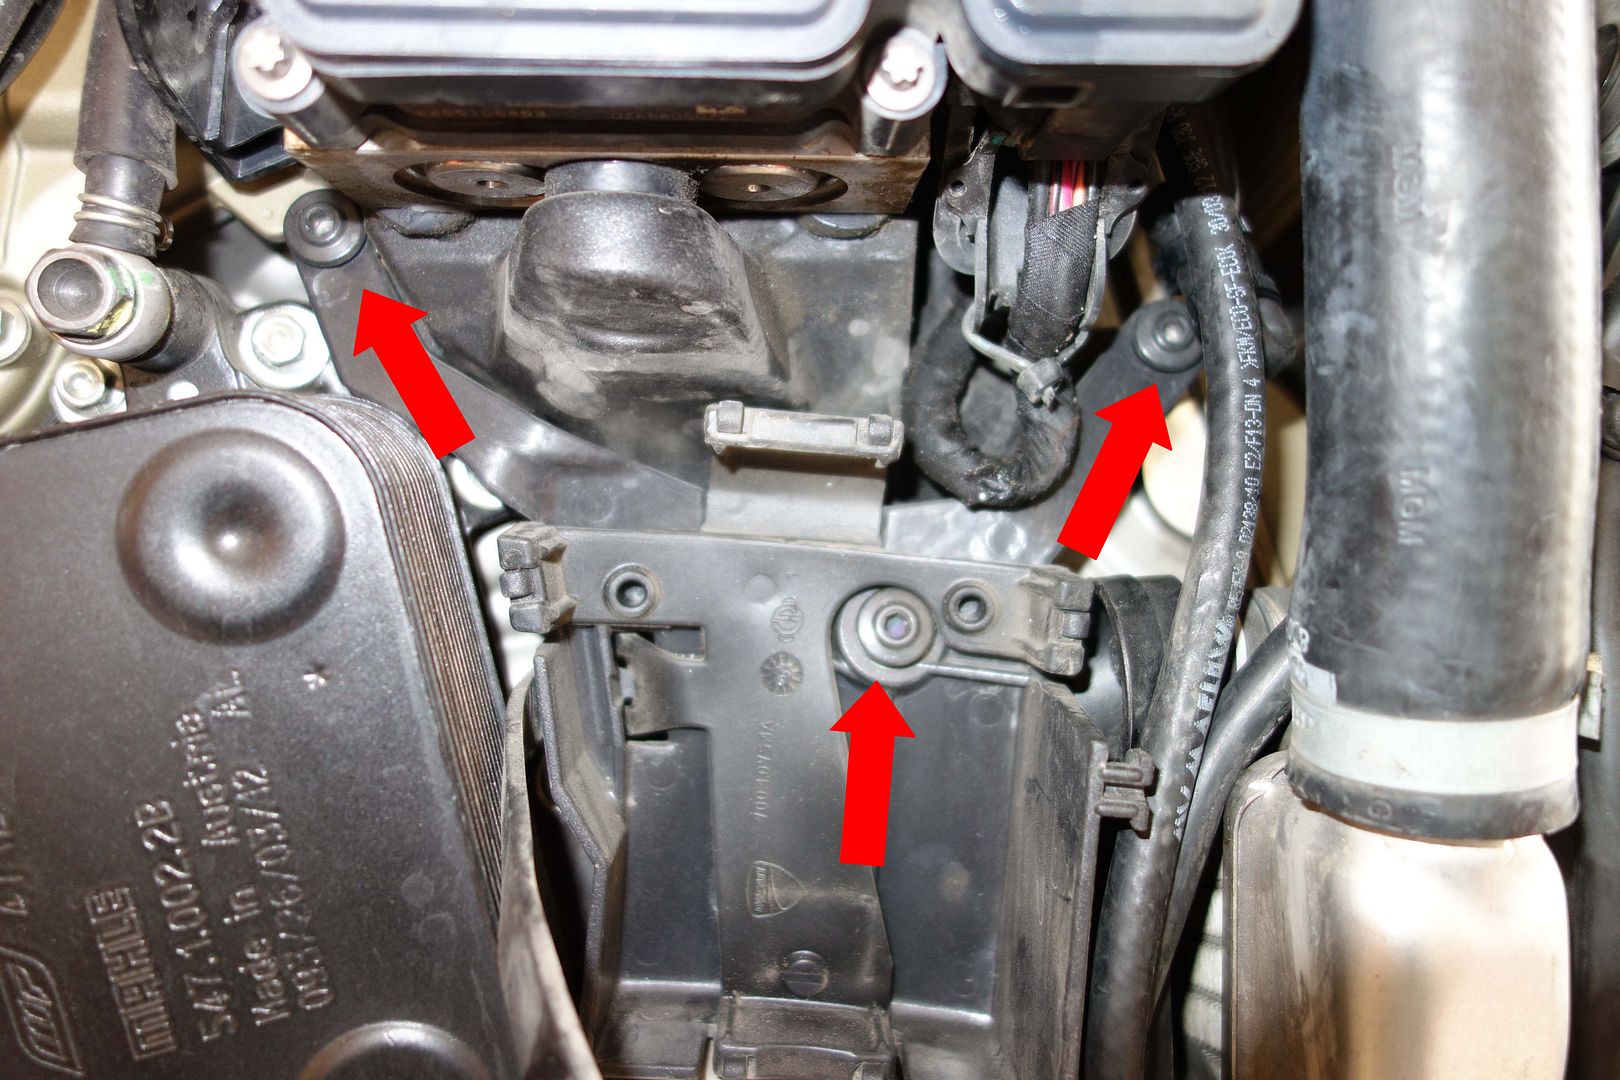
5) Remove the charcoal canister bracket by unscrewing the three screws marked in the pic below.

Finished (plugged line is hidden):

While you're at it, make sure the other fuel vent line (the one in the far right, closest to the front wheel, running vertically down) is not pinched or kinked when you put the bodywork back on. During my last service they pinched the line and I didn't discover it until I did this mod.
Great photos, I believe the V4 has a similar setup. Not many people are discussing removing the canister on the V4.
Was reading back through this thread and another that popped here recently and had a thought...
I've got a 2016 1299S that I am slowly rebuilding into a track bike after buying from an insurance auction in the fall. I've heard some say that they removed the electronic valve with no codes and others have to install a resistor to get rid of the code. I removed the valve from mine and it certainly throws a Check Engine Light when I crank it up.
My theory is that those with no light may have the upmap installed and maybe that is why the ECU no longer looks for the valve's presence. I have the full akra system, but have not taken it into the dealer to get the upmap installed yet.
I know this thread is quite old but perhaps Endodoc or GunMoto can add a data point to this with their configuration. Do either of you have the upmap installed? Anyone else remove the electronic valve AND have the upmap? Results? I'll be taking my bike in next week to get the upmap and EVO software update, I'll post my results here. I also fitted the blockoff plates and removed all the associated hoses and valves. Another code from that one that I'm hoping will be eliminated with the upmap install.
- Joined
- Mar 11, 2018
- Messages
- 260
- Location
- Houston,TX
Installing full akra and some mods on my 959, removing canister because it was having a hard time starting when hot which freaked me out because its a 2017 and no light are on.. always felt like it was pointless to have and finally Mani mentioned to me about the charcoal canister being an afterthought from Ducati, will report back how it does after removal..
- Joined
- Apr 6, 2013
- Messages
- 3,319
- Location
- Los Angeles
Where has antihero been? Is he still touring the world on whatever version of panigale he may be on now?
- Joined
- Dec 1, 2019
- Messages
- 2,756
- Location
- Mar A Lago
Where has antihero been
He’s been quarantined until further notice
- Joined
- Feb 25, 2013
- Messages
- 1,213
- Location
- TX
Dennis fell off of social media about two years ago. His Etsy account with his artwork seems to still be active though.
- Joined
- Dec 1, 2019
- Messages
- 2,756
- Location
- Mar A Lago
Actually... turns out CARB got to him b4 the virus
The motor vehicle code is not to be violated

In all seriousness I haven’t had any more problems with my 1299.
My dealer (somewhere, who knows) actually took it out for me after it was causing nothing but problems. They made me take it home with the bike because “they were doing me a favor removing it” as we know, the motor vehicle code and Ca Air and Resource Board rule the filthy streets. But in the real world: Ducati owners rule the streets
The motor vehicle code is not to be violated

In all seriousness I haven’t had any more problems with my 1299.
My dealer (somewhere, who knows) actually took it out for me after it was causing nothing but problems. They made me take it home with the bike because “they were doing me a favor removing it” as we know, the motor vehicle code and Ca Air and Resource Board rule the filthy streets. But in the real world: Ducati owners rule the streets
Last edited:
- Joined
- Feb 14, 2020
- Messages
- 90
- Location
- So.Cal
Actually... turns out CARB got to him b4 the virus
The motor vehicle code is not to be violated
View attachment 30051
In all seriousness I haven’t had any more problems with my 1299.
My dealer (somewhere, who knows) actually took it out for me after it was causing nothing but problems. They made me take it home with the bike because “they were doing me a favor removing it” as we know, the motor vehicle code and Ca Air and Resource Board rule the filthy streets. But in the real world: Ducati owners rule the streets
What did the dealer end up doing with your electronic valve? If it has a resistor on it will you snap a pic??
- Joined
- Dec 1, 2019
- Messages
- 2,756
- Location
- Mar A Lago
What did the dealer end up doing with your electronic valve? If it has a resistor on it will you snap a pic??
My bikes are not with me, I think they just removed and plugged the vacuum hose. I’ll dive into it when my bikes are delivered
- Joined
- Sep 24, 2018
- Messages
- 181
- Location
- Atlanta, GA
1299r FE with full Akra and upmap
removed canister today. I just used a bolt in my toolbox that got snug and the clamp. Vent / drain I just moved up by radiator and zip tied everything out of the way
first is it ok for the vent line to not be extended or t-d into the tank drain line?
I am getting a crackle type or aggressive tick at idle from one cylinder. Could this be vacuum leak? I didnt specifically go get an M6 bolt.
thx
Similar threads
- Replies
- 4
- Views
- 260
- Replies
- 11
- Views
- 1K
- Replies
- 19
- Views
- 2K
Register CTA
Register on Ducati Forum! This sidebar will go away, and you will see fewer ads.
Sign Up

