How to: change F to P on rear shock

Ducati Forum

Help Support Ducati Forum:

Exactly jarelj.


Everyone in the 848 was looking to swap out their progressive link for a flat one, and no one complained.

I run F for aggressive canyon riding and we have some real crap pavement, nothing can replace a properly set up suspension. Should I repeat that?

The whole process is dynamic which requires a bit of tuning skills and steps that need to be taken in order. Spring rate is something as jarelj mentioned, you don't skip on or it defeats your purpose. If your foundation is jacked, your chasing your tail with settings or adjustments of any kind.


F works beautifully and I couldn't imagine changing a thing.


I have not once had the rear step out on me other then pebbles/rocks or impacted clay.


Part of the success in setting up your suspension is getting rear sag set up for you, not someone else's measurements. We played with it in all areas, to soft and to tight to set it where I like it and what worked for me, FOR my typical road conditions where I like to ride the most.

Funny to soft, and its like a pogo stick pumping coming out of corners, to tight and you get what people are describing above that has little to do with P or F.


Part of the problem here, is that the with so many different adjustments possible, it leaves room for potential error at every step or every change.

An excellent post.
I couldn't agree more;)
 
Thanks for this, I wanted to change mine from F to P and does not show in the book fully.
Good thread.
 
Most of the "P is better" comments have come from people saying the bike's too stiff in the back and gets unsettled over rough pavement as a result. P does soften about the first third or so of the stroke, but the middle ratio's about the same as in F and the last part of the stroke is stiffer than F. That's what it's designed to be like. Bit of compliance for solo riding on real world roads, with enough resistance at the end for two-up riding.

Did a quick-n-dirty measure on mine in both positions recently just to see the difference. Pulled the shock and measured eye-to-eye distance at different wheel travel positions with the link in F and P. Not really accurate enough to post graphs or hard numbers (really need about .1mm accuracy to make that worthwhile), but in F it looks to stay at 2:1 all the way through (2mm wheel travel to 1mm shock travel). So F really is flat, or at least appears so on my crappy 1mm scale. P ends up creating a pretty straight line too; a very slight arc with the upward bow towards the middle rather than the end like you tend to see. In any case it's nowhere near as progressive as some bikes (my Daytona, for instance). Think two lines, one flat, and the other starting out lower but angled up a bit, so it crosses the flat one in the middle, and you have a good idea of how the two linkage positions compare to each other terms of effective spring rate. Think in the neighborhood of a 1.5:1 (stiffer) to 2.5:1 (softer) range instead of flat 2:1 and you'll be pretty close, but don't quote me on that. Need.better.measure; 1mm scale means +/-.5mm accuracy at best.

Anyway, with stock springs, that softer 1st 3rd will make the bike more compliant over bumps, but I didn't like what it did to chassis control. Felt like the rear wanted to squat and then pack, so I went back to F. I do need a little lighter spring on the rear of my base model at around 150lbs dry, but am trying to figure out what to go with. Dan Kyle said 8.0-8.5N/mm, so I was thinking 8.5 since everyone says the rear is a 9.0 and I'm not far out on my sag. However I'm thinking the base already has about an 8.5 on it. Coil, wire diameter & # of coils looks a LOT like 8.5 to me. Anyone have definitive numbers on the OEM base spring rates, or have measured them?

I tend to think F with the right spring is what you're going to be best off with for solo riding on relatively smooth surfaces (road or track), but I reserve the right to be full of it. Gnarlier roads might well favor P overall, even if you end up with a bit of wallow in the corners. But aren't those roads what Hypers are for? :p
What do you have your Rebound and Compression set at?
I too am around 150 and can not seem to dial this beast in? Thx
 
The suspension works best in flat. But can be hard......However if you back off pre load on the shock so it shows 4 threads onlyout of the nut. And ensure the shock lenght is 310mm centre to centre on the eyes your'll find a good setting.

The front forks sit through the top yolks by 10mm (top of alloy cap. Not tube)

The F or P does not effect either the operation of the shock or how it feels. thats down to the rebound and comp.

What is good is an adjustable ride height tie rod. That allows you to maintain a flat aspect ride height. Which tragically alters with chain adjetment or sprocket choices (more of a racing thing)
 
What is good is an adjustable ride height tie rod. That allows you to maintain a flat aspect ride height. Which tragically alters with chain adjetment or sprocket choices (more of a racing thing) Thx[/QUOTE said:
What should the ride height be?
 
Last edited:
So has anyone played with changing the ride height by extending or shortening the linkage?

the linkage has two positions in which I can be set properly so the locking bolt can locate, the change would be to great to extend the linkage and leave it in the F position, in saying that there is about a two turn margin in the correct location.

I had mine in P for a few months and for me with the standard spring and our roads seemed better. I'm back to F now but I've put in a 8.5 spring in and had the shim stack changed.
 
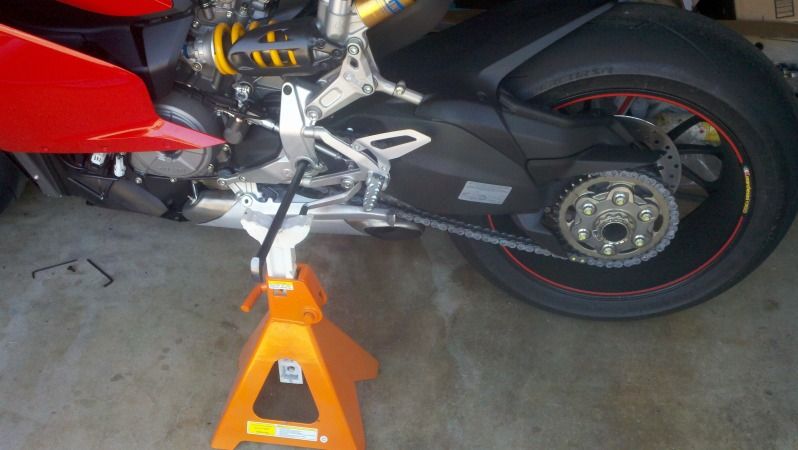
You do not need to go through all that. All you need is a cheapy automotive jack. Simply remove the rear hugger, pre loosen the F/P bolt and nut, and then remove the load off the spring by increasing jack height until you can spin the loosened bolt by hand. See my picture below.

attachment.php


As for the torque values, I measured and used 5 ft lbs on the pinch bolt screw and 24 ft lbs on two bolts depicted below. You do not need to loosen the torx bolt as it pivots anyway.

attachment.php


This method can be done with the bike sitting on the ground on the side stand. I only had my pitbull stand in place because I was doing several jobs at once. You also do not need a long wrench to remove the buried bolt for the other end of the linkage.

This job can be done in 15 minutes.

Have done the same as above but there is "load" on the p/f bolt,cant get it to spin free by hand. I have the bike on rear stand. Can i loosen it with a ratchet anyway?
 
Last edited:
Not much help here.. I borrowed the abba stand from a friend and bought inserts for Panigale 1199. Problem solved! I dont recomend this method above.
 
Ok so I switched my rear shock linkage from "F"(flat) to "P"(progressive) today and shot a few photo's. The rear suspension is still stiff but way better. I can actually feel the rear suspension moving now. My afternoon ride was much more enjoyable and the rear doesn't bounce sideways in bumpy turns.

Tools used:
8mm Socket
13mm Wrench
4mm Allen key
8mm Allen Socket
(2) 16" Pry Bars from harbor freight or 7/16" Rods
(2) Jack Stands
Wheel Bearing Grease

OK first thing I did was remove the lower fairings on both side's. Its not really necessary but I did it anyways just because they get really really close to the lifting points where your inserting the pry-bars/rods to lift the bike. Refer to manual to remove lower fairings.

Next I placed one pry-bar inside the large hole right in front of the rearset(right side) and placed a jack-stand under it. The bike was not lifted at all at this point. I then straitened the bike, made it level and placed the other pry-bar on the other side of the bike(left) with a jack stand under it. This holds the bike level and upright. I then moved from side to side lifting the pry-bar while raising the jack-stand and letting it lock into position. This slowly lifted the tire in the rear off of the floor. If you have some other sort of stand that will lift the bike while letting the rear tire hang go ahead and use that instead.
2012-06-23_12-44-10_596.jpg


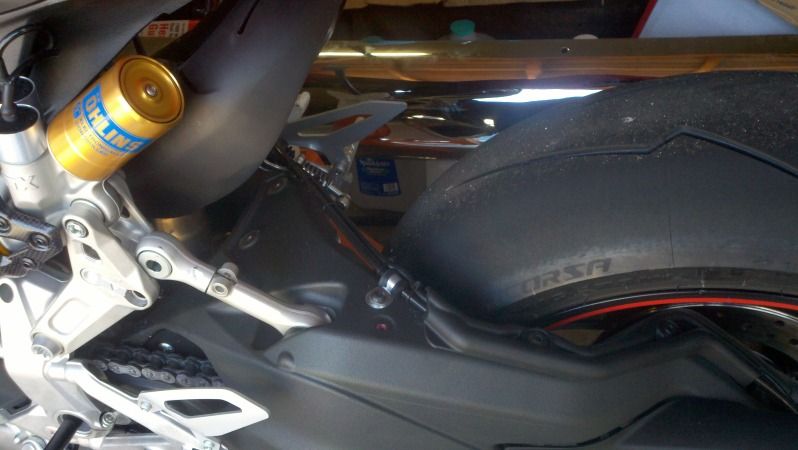
I recommend that you remove your rear fender using the 4mm allen key(I could not get my allen socket to fit under the exhaust). There are 4 bolts, 2 on top and 1 on each side. I didn't remove the rear fender at first and ended up doing it later to give me more room to rotate the linkage.

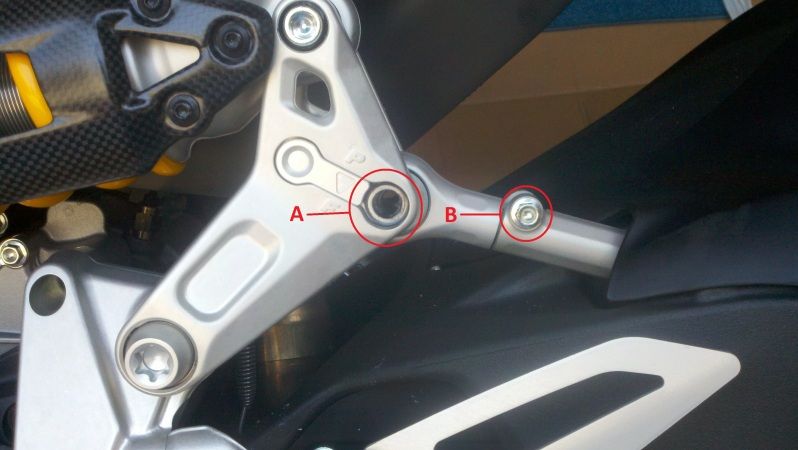
Remove Bolt A(swing arm push rod pivot bolt) using the 8mm socket and 13mm wrench for the nut on the back side. The rear tire will need to be supported as it will want to hang loose. And lift the push rod out of the linkage.

Now remove Bolt B(swing arm push rod retaining bolt) with an 8mm socket.
2012-06-23_12-50-25_221-1.jpg

2012-06-23_12-56-38_397.jpg


I put the push rod bolt inside the push rod to twist it loose so I wouldn't make marks with pliers.
2012-06-23_12-57-47_663.jpg


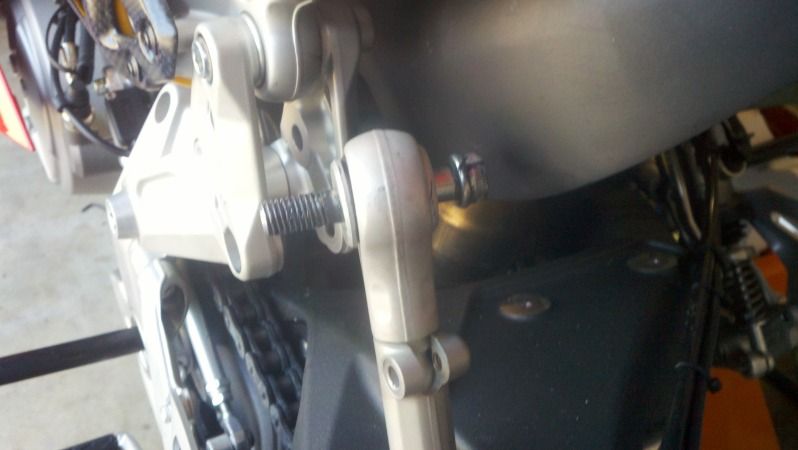
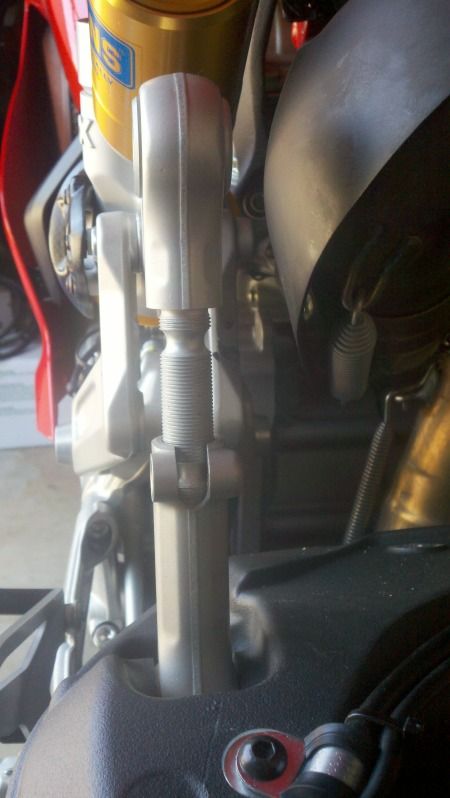
You will notice there is a slot where the push rod retaining bolt(B) was. You have to unthread (counter clockwise) the push rod a little over an inch to the second slot. This was very tight to unscrew. Now reinsert the retaining bolt and leave it loose. This will allow it to twist and line up later when putting it back together.
2012-06-23_13-04-18_192.jpg


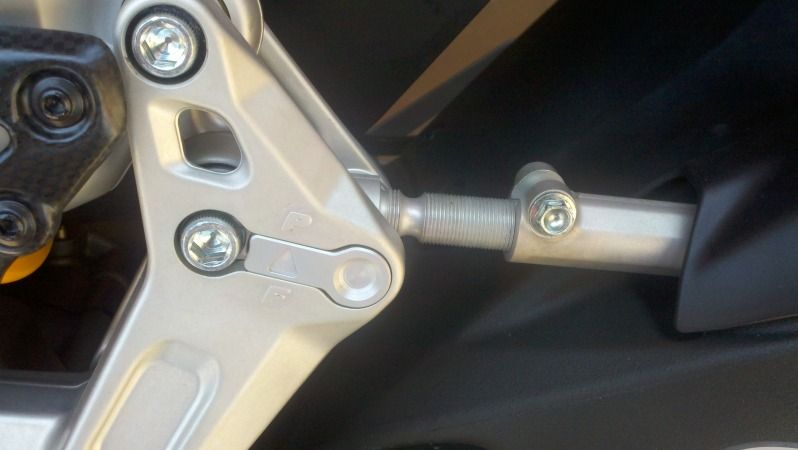
Next is to pop out the little bracket(indicator block) that has the arrow pointing down to "F" and flip it 180* so the arrow now points up to "P". It will now block the original hole that the push rod bolt was in.

You are now going to place the push rod ball joint into the linkage. It will now go into the hole on the linkage that is closer to the front. I had to lift he bike a little and move the rear tire up/down to get the ball joint and linkage holes to line up. It would definitely make it easier to have two people.

Reinsert the push rod bolt(A) with grease and tighten up the nut on the back side. IMPORTANT: you now must tighten up the retaining bolt(B).

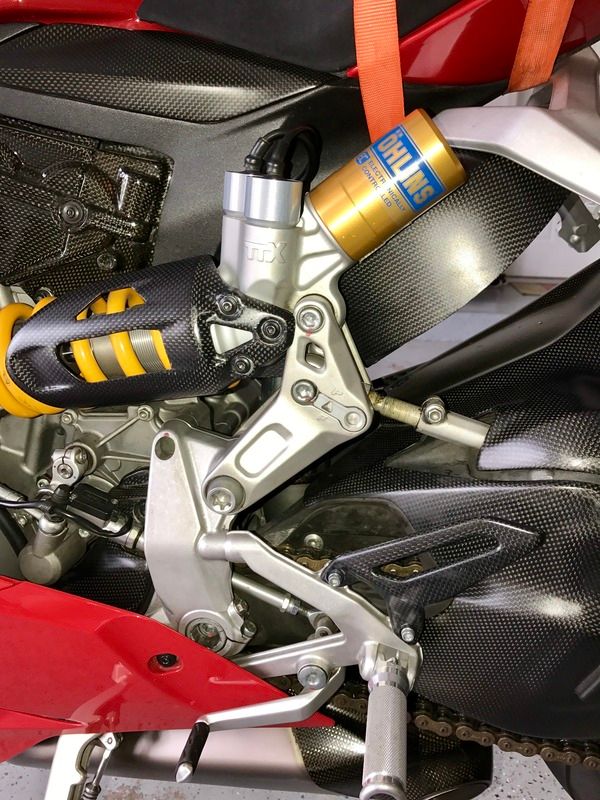
When its done it should now look like this. Notice we are now using the front hole(was covered by the indicator block) and the push rod is threaded out further.
2012-06-23_15-19-46_378.jpg


Lower bike one side at a time from the jack stands and reinstall rear fender and lower fairings.

Thank you Sir for this very helpful post
 
I am trying to replace my suspension link with a gold ducabike one, I'm unable to unscrew that inner #4 bolt due to positioning. Not sure if that bolt and the link are one piece or two, it slides out, but not completely as it hits the exhaust. Any suggestion please?
 

Attachments

  • IMG_7661.jpg
    IMG_7661.jpg
    98.9 KB
  • IMG_7659.jpg
    IMG_7659.jpg
    83.5 KB
Unscrew top and linkage bolt first. Having two torx hold one and unscrew the other. Its two pieces if i remember correct. Try to wiggle and move the plate,it should go out pretty easy.
 
Great topic guys, please correct me if I misunderstood some of the comments. The manual recommends "F" for track usage but are you all say "P" is actually is better? My Pani will be a track only bike so I'm trying to get the best advised from some of you guys that have put some miles on your bikes. Thanks!

Track only = F
But meet w/ Dave Moss and have him help setup your bike
best $40 I ever spent
 
I tried my hand on this mod since my rear is on Flat and wanted to get the wife to ride with me.

It was fairly simple, other than removing the face of the linkage like Zelnik. You have to spin the eye of the wishbone out so this is necessary.

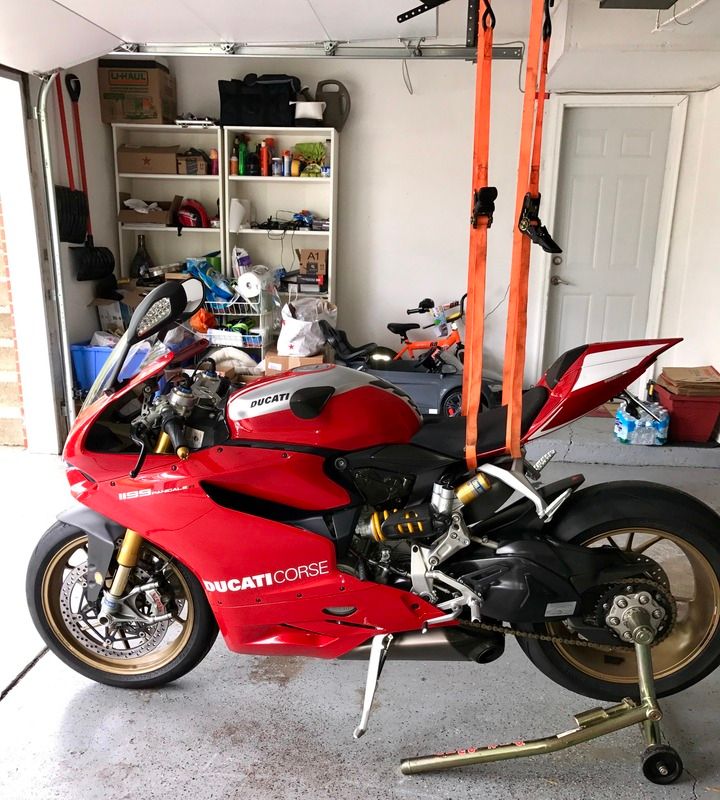
Since all of us transport our bikes one way or another, everyone should have these straps.

F24F9D67-A50A-451C-B3D0-3239093C5C0E.jpg


B4CF579B-E549-4357-982A-2237B70EF52D.jpg


Have done the same as above but there is "load" on the p/f bolt,cant get it to spin free by hand. I have the bike on rear stand. Can i loosen it with a ratchet anyway?
 

Register CTA

Register on Ducati Forum! This sidebar will go away, and you will see fewer ads.

Recent Discussions

Back
Top